In this article
You’ve heard the buzz about I-tip extensions — that featherlight, no-glue, no-heat method that adds length and density without anyone being the wiser. Ready to try them yourself? Here’s exactly how it’s done.
What Are I-Tip Hair Extensions?
I-tip extensions (sometimes called cold-fusion or micro-link extensions) are individual strands tipped with a small keratin-bonded end. Instead of glue or heat, each strand is threaded through a tiny silicone-lined bead, then clamped to a section of your own hair. The result is a discreet, flexible attachment that moves naturally and leaves no sticky residue behind. New to the method? Start with our complete guide to i-tip hair extensions — all you need to know.

Because they install bond by bond, I-tips are wonderfully customisable — perfect for adding seamless length, building fullness through fine or limp areas, or placing a few strands of dimension exactly where you want them. At Prarvi, our I-tips are cut from 100% human Indian Remy hair, so they blend, take heat, and behave like the strands already growing from your scalp.
What You’ll Need
- Your Prarvi I-tip extensions, matched to your shade and texture
- Silicone-lined micro beads (sized to your hair’s density)
- A bead/loop threading tool and a pair of micro-link pliers
- A rat-tail comb for clean sectioning and a set of clips
- A mirror with good lighting — ideally a second mirror for the back
How to Apply I-Tip Extensions, Step by Step
- Section your hair. Use the rat-tail comb to part off a clean, horizontal row about an inch above your nape. Clip the rest of your hair up and out of the way so you’re working with a single tidy section.
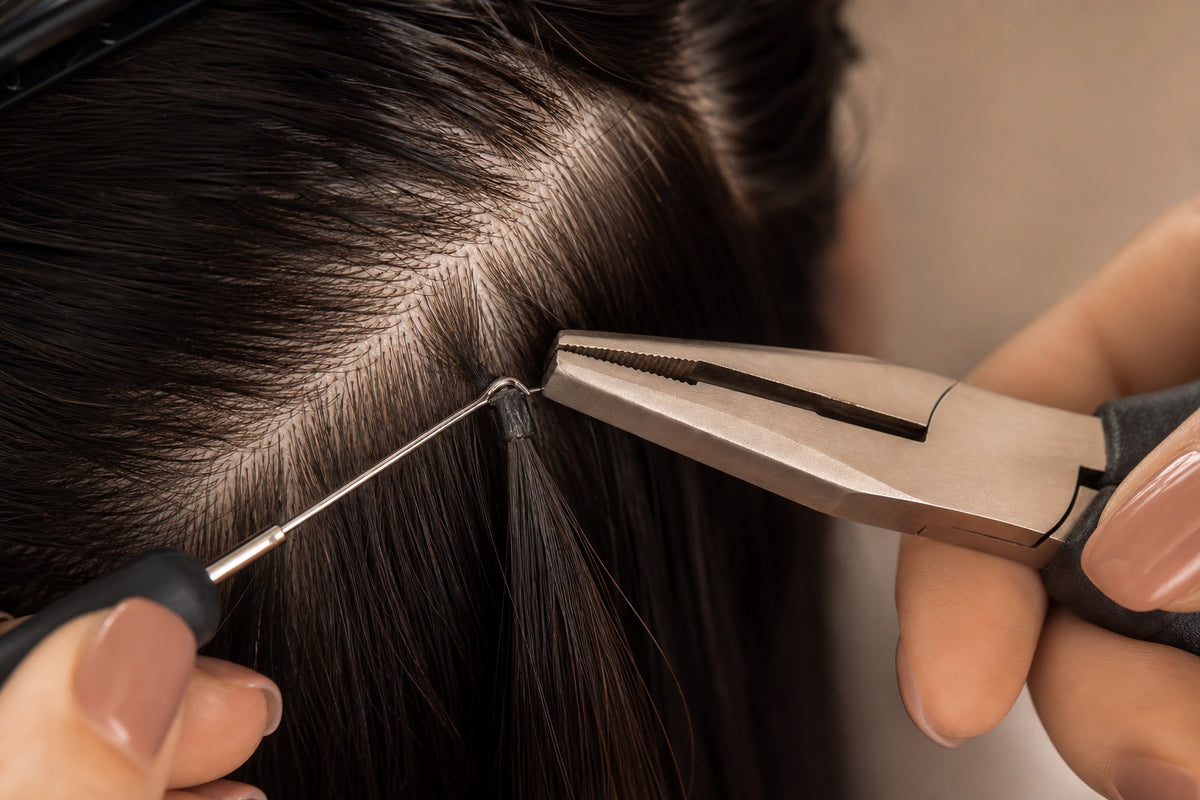
- Thread the bead. Pass your threading tool through a micro bead, then pick up a small piece of your natural hair (roughly a quarter-inch) and pull it through so the bead slides up the strand, stopping about a centimetre from your scalp — never flush against it.
- Add the I-tip. Slide the keratin-tipped end of the extension into the open bead alongside your own hair, making sure the extension faces the same direction it will hang.
- Clamp it shut. Use your micro-link pliers to flatten the bead until it holds firm. It should feel secure but never tight or painful at the root.
- Work row by row. Repeat across each section, leaving enough space between bonds so the finished result lies flat and undetectable. Build upward, row by row, until you reach your desired fullness.
- Style as usual. Once every bond is in place, brush gently from the ends up, then heat-style, curl, or straighten just as you would your own hair.
Choosing the Right Hair: Match by Texture, Not Guesswork
The most natural blend comes from matching your extensions to your hair type — fine, medium, or coarse, and straight, wavy, or curly — rather than eyeballing it online. Only three of our textures are genuinely natural off the donor (straight, natural wave, and natural curl); every other pattern is gently steam-set to hold its shape. Natural Black (#1B) is our true unprocessed shade, while lighter colours are achieved through careful lift, so they’re beautifully toned but no longer “raw.”
Not sure where you land? Order a sample set or use our shade & texture match service before you commit to a full install. It’s the easiest way to guarantee an invisible blend.
Care Tips for Long-Lasting I-Tips
- Brush daily with a loop or soft-bristle brush, holding the bonds steady at the root to prevent tugging.
- Sleep with hair loosely braided or in a low pony to avoid tangling at the beads.
- Use sulphate-free, lightweight products and keep heavy oils away from the attachment points.
- Have your beads checked and shifted up every six to eight weeks as your natural hair grows out.
Frequently Asked Questions
Do I-tip extensions damage your hair? When sized correctly and installed without tension, the bead-and-clamp method is one of the gentlest around — no glue, no heat at the root. Damage usually comes from beads that are too heavy or pulled too tight, which is why a careful match (or a professional install) matters.
Can I install I-tips myself? The back rows can be tricky to reach, so many people do a hybrid: DIY the sides and ask a friend or stylist for the back. If you’re new to micro-links, booking a professional for your first install is a smart move.
How long do they last? The hair itself can last many months with good care; the install typically needs a move-up every six to eight weeks as your roots grow.
Are I-tips good for thin or fine hair? They can be, when applied with lightweight, well-spaced bonds. See our guide to extensions for thin hair for placement tips. Note that Prarvi extensions are a cosmetic hair piece for adding length and volume — not a medical treatment, and not intended to diagnose, treat, cure, or prevent any hair-loss condition.
Shop I-Tip & Micro-Link Hair Match My Shade & Texture
References & further reading
- I-Tip Hair Extensions: All You Need to Know
- Indian Remy Hair: All You Should Know
- Hair Extensions for Thin Hair
Shopping for raw single-donor Indian hair?
Bundles, closures, frontals, wigs & toppers — raw, single-donor Indian hair, US-based and shipped fast from New Jersey. Not sure what to pick? We'll help you match texture and length.
